 Loading... Please wait...
Product Description
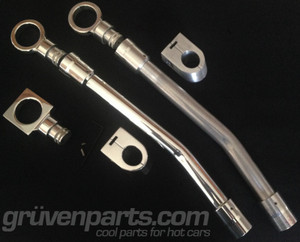
GruvenParts is proud to re-release these beautiful 1.8T dipstick handles with billet funnels. These come in an as machined finish but you can easily polish them up if you wanted a chrome look. These parts are precision CNC'd from aerospace grade 6061-T651 aluminum right here in the good ole USA. Don't fall for a Chinese knock off, buy direct from the source !
Our billet dipstick handle is available in a traditional round designs and will take the place of your existing fugly orange dipstick handle while retaining the stamped steel rigid OEM dipstick wire. Braided wires just don't work as they bend in the tube and can provide incorrect oil level readings. So re-use your existing OEM wire AND get rid of the construction cone orange handle. This is truly the best of both worlds.
This version fits in place of OEM P/N 06A-103-663B (06A103663B) dipstick funnel found on 1.8T Audi TT, MKIV Golf, Jetta, and New Beetle. Please make sure to check your specific vehicle, as VW and Audi have both produced several plastic orange versions.
INSTALLATION INSTRUCTIONS
1. Carefully trim off the orange ring handle on your OEM dipstick just above the base portion that plugs into the tube. You can use a box cutter knife, or dremel tool. Be careful not to cut the internal metal wire.
2. Now trim off the orange base portion that went into the tube. You should only have a metal wire remaining at this point. You can use a box cutter knife or dremel tool, again being careful not to cut the internal steel wire.
3. Using a dremel tool or similar, trim off exactly 3/8" (0.375") from the HANDLE end of the wire.
4. Attach the GruvenParts.com billet threaded base with 2 orings onto the handle end of wire. Snug it down using the provided set screws.
5. Screw on the billet GruvenParts,com billet handle in your choice of round or square designs, high polished or as machined.
6. Remove OEM plastic tube and throw it in your neighbors yard. Install GruvenParts.com billet tube (press fit onto oil pan stub tube, same as OEM fit). Install dipstick into tube.
7. Enjoy an IPA - we suggest Terrapin Hopsecutioner, or Heavy Seas Loose Cannon :) **
** Please drink responsibly. Always remember : Allow 8 hours from bottle to throttle !
Product Reviews
-
Premium Look...

Posted by Tiago Guerreiro on 9th Jan 2018
...Premium Look, complements the engine bay well with R8 and 911 caps.
Quality is off the chart, it is an investment for life, never going to break again!!!
I recommend it to any vag or car enthusiast in the world...
I think you should offer color applications to complement the purchase going to paint mine in black just because of authorities.
Best regards from Portugal ^^
-
Billet v Plastic - Gruven wins by KO

Posted by Markus on 22nd Sep 2017
Great product and certainly a huge improvement over the OE plastic scrap that VAG passes off as a dipstick tube!
Plus it looks awesome!
-
NO Brainer

Posted by Unknown on 9th Aug 2016
Cant believe why plastic would ever be used in an engine. This is a solution to it. Looks great and functions. No more worries of broken dipstick holders. The video was out of date. I figured that you had to remove all the orange plastic on the oem dipstick and trim the excess dipstick. Remember, measure your oil level before removing the old holder and use that oil level mark after your modification.
-- Response from Gruven --
Thanks for your review ! Im not sure which video that you referenced but we have put the instructions at the bottom of the product page here :
http://www.gruvenparts.com/billet-1-8t-dipstick-and-tube-combo/
As always please call or email anytime if you need help. We would love to see pics posted on vortex of this product installed in your car !
-
beautiul solid product

Posted by Phillly Phil on 28th Apr 2016
I was happy to see the product is a solid construction. My oem tube was crumbling constantly.
The tube is good looking, and seals well too. They've engineered this to the perfect tolerances.
my only complaint
I was confused why the tube didn't come with an actual stick, and no instructions. I see now that the instructions on the site, but that was not clear to me. I was not sure how to disassemble the tube to get the stick in...but I figured it all out...a simple single print out of the instructions could have helped
I'd buy this again

